A sequence of steps to take
 There is a clear sequence of steps to take to achieve perfect viewing. These are detailed in the box below. A word of warning: Take care when adjusting the focus knobs that you do not advance the objective lens onto the slide! It is very easy to break the slide and possibly damage the objective.
When setting up the focus it is best to view from the side and lower the objective so that it is nearly, but not, touching the slide. Now adjustments can be made while viewing through the eye-piece and slowly winding the objective UP and AWAY from the slide – this way you avoid any potential damage to either the slide or microscope.
Getting things in focus
Once the specimen is in focus, fine adjustments in illumination and iris aperture can be made to improve viewing.
The slide should be scanned systematically, usually by finding the top corner of the cover glass and then moving the slide slowly across the stage to the adjacent corner. When the opposite side is reached the slide is moved up until a new field of view is visible and then moved slowly across to the other side. This is repeated until the bottom of the slide is reached.
Higher magnification are obtained by rotating the nosepiece turret and selecting another objective and then re-focusing.
Parasites are often transparent
Since many parasites are transparent to light it is often necessary to use various techniques to highlight them. The two most popular methods are phase contrast and darkfield. Both of these methods are outside the scope of these pages, but essentially they manipulate the light so that transparent objects are more readily visible. These specialist methods usually mean adding special condensers of objectives to your microscope. While these methods are useful they are not essential for fish disease diagnosis.
If there is a problem with viewing any specimens with an ordinary brightfield microscope it is possible to increase the contrast by racking down the condenser or closing up the iris aperture, although it does reduce resolution.
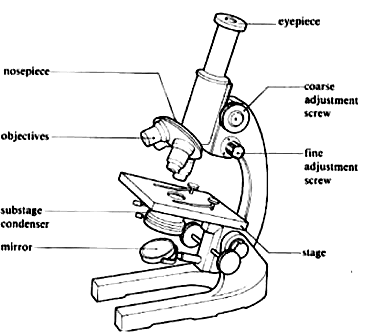
Scheme for setting up a simple monocular microscope

- make sure the 10x eyepiece is in place at the top of the draw tube
- raise the body tube a few inches above the stage – by looking from the side and turning the course focus knob
- rotate the nosepiece and click the lowest power objective into place above the stage (usually a 10x)
- adjust the illumination if using a mirror, turning the flat side of the mirror towards the light source so that light is reflected up towards the condenser
- rack the condenser up to within 2mm below the stage and adjust the iris diaphragm until it is half open
- place the specimen on the stage making sure that the cover glass is uppermost and secure it with either the stage clips or the mechanical stage arms
- adjust the angle of the mirror so that a spot of light appears on the slide directly below the objective lens
- looking from the side and using the course control knob, lower the objective until it is just above the slide
- look through the eyepiece. Adjust the mirror to give an even amount of illumination
- use the course control knob to slowly rack the objective upwards and look through the eyepiece until the specimen is in focus. (Tip) it is sometimes easier to focus on the edge of the cover slip to start with as this gives a nice clean edge when in focus – whereas mucus can sometimes be difficult “to find”
- use the fine focus to obtain the sharpest possible image
- if the light is too bright either use a bulb with a lower wattage (if using a table lamp to illuminate the mirror) or adjust the iris diaphragm to reduce glare
- focus the light source onto the slide by slowly racking down the condenser – watch that this does not affect the mirror angle. Adjust the condenser and iris diaphragm to give optimum illumination. Ideally, once the condenser is set in the optimum position, there shouldn’t be any need to keep altering it.
While this long list may seem daunting, it is because I have tried to cover every step. You will also note that much of it revolves around optimizing the light source if it is mirror based. With a fixed light source many of these steps can be ignored. After you have set up the microscope a few times it should become second nature.
