Setting up
The most common cause of disappointing results is poor setting up of the microscope before use. The performance of almost all microscopes can be improved if a little time is spent focusing before use. No matter what quality microscope you buy, it makes sense to get the best possible image it is capable of.
Neglected
An often neglected part of the microscope is the substage condenser, found on all but the most basic of instruments. The condenser focuses and concentrates the light uniformly onto the specimen. Most importantly, because it controls the size of the cone of light illuminating the stage. It also controls resolution – i.e. how sharp or fuzzy the image is.
Critical focusing
Ideal illumination is obtained by critical focusing which ensures that the specimen and light source are properly centred and focused, with just the right amount of light to give a clear, uniformly bright image.
Setting up for critical focusing
Put a prepared slide on the stage and bring it into focus with the 10x or 20x objective
Next focus the condenser. How this is done depends on whether light source has a field diaphragm such as found with Köhler-type illumination. Köhler lighting systems have an iris or field diaphragm which controls the aperture of light going into the condenser. Although this form of illumination is gaining it popularity, it is would not normally be found on the average hobbyist microscope.
Focusing the condenser on a microscope without an iris diaphragm is carried out by removing the slide from the stage and placing a piece of thin card half-way across the light source aperture. Adjust the condenser – not the stage or objective – by racking it up or down until the card is in sharp focus when viewed through the eyepiece lens. This usually occurs just as the light interference halo turns from blue to red.
At this point the condenser is properly focused and should not need to be adjusted again. With Köhler lighting systems focusing is carried out in exactly the same way – only focusing on the leaves of the diaphragm rather than a piece of card.
Centering the condenser
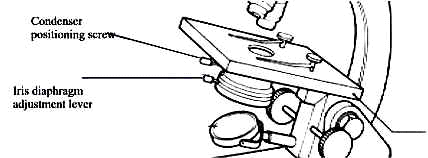
Next, it is important that the condenser is centred or it will focus the light at some point to the side of the specimen. To centre the condenser close down the iris diaphragm and remove the eyepiece. Looking down the viewing tube you will see a small point of light (see diagrams). Make sure that the light appears in the centre of the tube by adjusting the condenser positioning screws. This takes a bit of fiddling about – but is simple once you are used to it.
|
|
|
With the eyepiece removed, look down the viewing tube when you will see something like the diagram on the left – an off-centre light spot. Adjust the condenser centering screws until the light is in the middle |
The iris diaphragm

The stage, condenser and iris diaphragm
The final step is to adjust the substage or iris diaphragm. This is done with a lever or screw found on the condenser which works in a similar fashion to that of the iris of a camera. As the iris is opened it allows more light into the condenser. The iris diaphragm is often used incorrectly to control light intensity. While this might seem logical, its proper use is to control the size of the cone of light entering the objective lens. The correct iris diaphragm setting varies with each objective. Consequently it needs to be re-adjusted every time you change magnifications
To set up the iris diaphragm look down the viewing tube without the eyepiece in place and slowly open up the iris diaphragm until the circle of light just about fills the viewing tube. Finally replace the eyepiece, re-focus and adjust the light intensity if your microscope has rheostat control.
|
|
|
Once the light spot is central, open up the condenser iris until the light just fills the field of view. Replace the eyepiece |
Provided that your lens and slide are clean you should now get the best possible image.
.


